
It is a well-known fact that the chickens will eat whatever they can get their beak onto. They are one of the types of omnivores that are relatively easy to raise. That is why the number of keepers is increasing day by day. Nevertheless, to keep them healthy and to get top-notch eggs, they would require quality feed.
That being said, we are here to share a secret with you guys. We have been following the process of fermenting the feed, and we were pretty much shocked by the results. And we will show you how to ferment chicken feed properly. Also, the process is reasonably hassle-free. So, sit back and continue reading.

What Exactly Is Fermented Feed?
In a nutshell, this feed is prebiotics for the chicks. It is a type of wet mash, which most of the keepers refer to as moistened food that is formed by fermenting by lactic acid. And Lacto-fermentation occurs naturally in the environment. It basically increases the count of beneficial bacterias in the feed.
On that note, the process that is followed for this fermentation is the same exact process that occurs naturally in sauerkraut. Like the sauerkraut, it will contain bacterias that are beneficial for the gut. Among them, the Pediococus, Lactobacillus, and Leuconostoc are mention-worthy.
This feed will also contain a generous amount of yeast and other types of bacteria. All of them will be beneficial for the digestive system.
Why Should You Ferment Chicken Feed?
Now that you know what fermented chicken feed is, you might also want to know about the reason you should ferment the feed, right? Well, there are a handful of reasons why you should feed your flock fermented feed regularly, or at least once in a while. It will offer plenty of benefits, which the regular feeds can not offer.
In a nutshell, this practice of feeding the flock fermented food will improve the overall digestive system. It will enhance the ability to absorb nutrients. Also, it will improve the overall condition of the health by introducing probiotics to the diet. Basically, it is an efficient way of keeping your flock healthy.
Furthermore, fermented foods can reduce the number of grains need to keep the flock full. Also, there will be less waste, which will help cut down the cost even more. Lastly, thanks to having certain bacterias, it can enhance the quality of the eggs too.
How to Make Fermented Chicken Feed?

Let us now get back to the main topic we have in hand, which is the process to make this feed. And the steps that you need to follow for this is as follows:
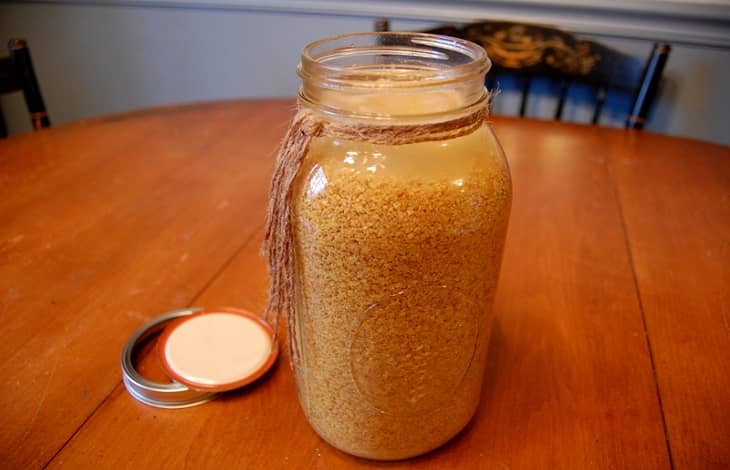
Step 1: Put the Feed into the Container
First of all, you must source a proper container to ferment the feed. We generally use large glass jars for this, but you can also use a large bowl or a large bucket. However, as the fermentation will make the food a bit acidic, we would highly recommend using glass, BPA-free containers, or ceramic.
On that note, the capacity of the container should be enough to hold one or two days’ worth of food. Also, there should be a generous amount of room left. This room will be for the water, stirring the feed around and letting the grains properly expand and absorb the water.
After selecting the right container for the process, pour a good amount of feed into it. As we have mentioned above, the amount should be one or two days’ worth. Usually, we ferment about two cups of the feed, which is enough for two days. On that note, you can ferment most of the types of feed.
Starting from the pellets to crumble to whole grain, you can ferment them all. But our recommendation would always be to choose the grain feed. Those hold the best, while others expand a lot and get a bit mushy. And not all of the chickens tend to love eating mushy food.
In addition to that, it is possible to ferment scratch. But as we have mentioned multiple times before, you should not replace scratch with feed. It should always be treated like a treat.
Step 2: Pour Water into the Container
After putting the right amount of feed into the container, you need to pour dechlorinated water inside the container. If you do not have access to dechlorinated water, you can also use filtered water. It is going to work the same way as the dechlorinated water.
However, you might not even have access to filtered water. In this case, we would recommend putting tap water into a bowl and leaving it out for the night at room temperature. This will allow the chlorine to dissipate, and you can easily separate the filtered water from the top.
Nevertheless, add enough amount of water so that the feed is totally submerged. There should be a couple of inches of room left on the top for the food to expand a bit. Do make sure that you do not use chlorinated water here, or else the fermentation will not take place.
Step 3: Cover the Container
Now that you have poured the water inside the container, you should close the container properly. For this, you must get a loose-fitting lid to cover the top of the container. If the original lid does not provide a loose fit, build a makeshift lid. Make sure that it does not leave the container airtight.
By covering the top with something that offers a loose fit, you will basically prevent the mold spores from getting inside the container. However, the lid will allow the fermentation gases to escape, which is essential for the process. And without the lid being loosely fit, the gases will not be able to escape.
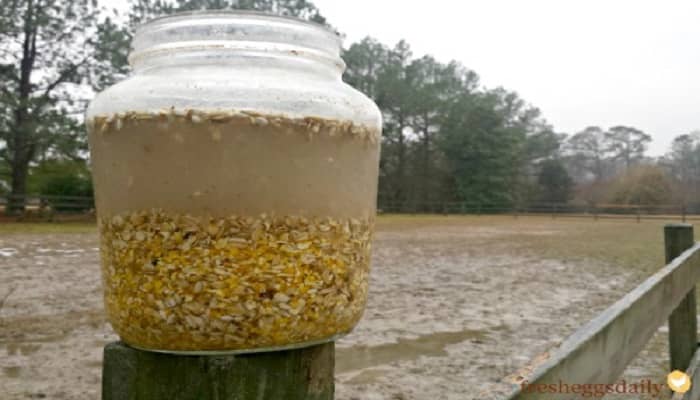
Step 4: Allow the Fermentation to Take Place
After closing the container properly, keep it in a place where the temperature is moderate. It should be there for three to four days. However, you need to check and stir it around after each day. Sometimes, you might have to add additional water if the grains inside have absorbed all of the water in the beginning.
Usually, we leave our jars on the counter, and that place works like a charm. After two or three days, you will notice that there are small bubbles on the surface. There will be bubbles in the mixture as well. These bubbles are basically a sign that the fermentation is working flawlessly. The lactobacillus is hard at work in this case.
Depending on the feed you chose, the smell can be a bit off as well. Also, the water will be a bit cloudy. However, do make sure that the smell is not putrid. And if you notice molds forming inside, throw the whole thing away. Do not feed this feed to your flock because they will get sick right away.
Nevertheless, during the fermentation process, the feed should be properly preserved, thanks to the low ph level of the whole system. And the feed should be totally safe to consume within day three or four. But the longer it sits, the sourer it will get. So, the chooks might not eat it if you keep it longer than three days.
Step 5: Drain the Water
After three days, it would the time to drain the feed. However, in most cases, the feed might absorb all of the water inside the jar. But if it does leave any, we would recommend reserving the liquid to jump-start another batch. With that water, a new batch of feed should be ready within two days.
Additionally, this reserved water can be used to make staggered batches. And if you are wondering what we mean by staggered batches, it is basically getting fermented feed every day. However, if you do not want to reserve the water and want to start a batch from the get-go, drain it off into the bushes.
Step 6: Feed the feed
As you have taken the feed out of the water, it will start spoiling exceptionally fast. For that reason, it would be wise to feed the feed to the chickens as fast as possible. Also, if you have fermented a batch with two days’ worth of feed, instead of draining the whole feed, scoop some out from the container for one day.
Then, for the second day, drain the water or keep it reserved for the following batches. You can also halt the fermentation process by keeping the jar inside the freezer. However, ensure that the jar has the fermented water inside because, as we mentioned, the feed will spoil exceptionally fast without the water.
What Are the Health Benefits of Fermented Chicken Feed?


After learning the process of making fermented feed, you might be wondering if they are worth it or not. Well, these health benefits will surely let you know if they are worth making or not:
Improved Digestion System
We have mentioned earlier that the fermented feed increases the overall condition of the digestive system. The first thing that can back this up is the grains, which soak up the water. And water-soaked grains are reasonably easy to digest. Also, the other softened feed will be gentle to the stomach.
Additionally, all of the seeds, beans, nuts, and grains contain something called phytic acid. They also have other enzyme inhibitors. This phytic acid holds the ability to impair the absorption ability of certain minerals and nutrients. For that reason, many refer to this acid as being “anti-nutrient.”
But, for the soaking process, the content of phytic acid in these grains lower substantially. As a result, the chances of the chicken’s gut not being able to absorb nutrients and minerals in the future lowers down significantly.
Enhances the Immune System
Another thing we have mentioned before is that this feed enhances the immune system of the chicken. Well, it does that for carrying lactic acid. This will make the population of the beneficial bacteria inside the body bloom. As a result, the immunity system will see a major improvement.
Different researchers say that the gut is directly related to the health of the body. Considering that if the gut stays healthy, the body should remain healthy. And it is a well-known fact that probiotics are capable of maintaining a robust immune system.
On that note, if the immune system is well-maintained, the chance of the chooks getting sick will be considerably low. And as the fermented feed lowers the pH value of the intestine, the acid-sensitive bacterias, such as E.coli, will not be able to live in there anymore.
As a result, the chooks that would be eating the fermented feed on a regular basis will be less likely to have infections in their body. They will eventually have a longer lifespan and a less complicated life, which means you will be relieved from the stress of vet bills and medicines.
Improves the Quality of the Eggs
Apart from having a better immune system, the chooks will be laying good quality eggs as well. The eggs will be a bit hefty, and the shell will be stiffer. And when the shells are nice and firm, the chances of the chooks facing difficulty while laying the eggs will be considerably low.
Additionally, the fermented feed can make the eggs more nourished because, as you know, what goes through the beak of the chickens come out as the egg. Also, thanks to the feed offer good value for the money, it would be possible for you to feed the chooks this feed regularly.
Final Words
Fermented feeds are truly something magical. The boost on the health and the immune system they can bring is truly worth the time and effort we put into it. And as you now know how to ferment chicken feed, hopefully, you will also be able to enjoy all of the benefits it has to offer.